Drill Press (RF 40-HC)
Emergency Stop and Reset Buttons
Power to the drill press is applied through a power relay that is activated via the RESET button (located below the emergency stop). After the relay is activated, the Forward/Reverse switch controls motor spin.
Pushing the emergency stop causes the power relay to open thereby disconnecting power to the motor. The emergency stop button needs to be reset and the RESET button pushed to again supply power to the motor.
If the drill press is running and the power is interrupted, say by a power failure, the machine will remain off until the RESET button is pushed.
Oil Capacity
Approximately 2L (0.54 US gal) of oil in the gear box places the oil level at midway in the fluid level indicator. We use standard hydraulic ISO 68 (SAE 20) oil.
Tipping the Head
Tools needed:
- No. 2 Phillips screwdriver
- Small adjustable wrench
- 15/16" open-ended wrench
Procedure
Part numbers (e.g., #xx) refer to the parts diagram shown on p. 23 of the user’s manual. Also see above figure.
The brass vent (#89) on the head body cover (#84) will leak oil if the head is tipped too far (say during an oil change). You may have to tape the vent cap to prevent oil from escaping.
Remove the locking pin situated on the right-hand-side of the head body (#11), above the 5/8” hex nut (#63). Tighten the nut on the locking pin to extract it. (The locking pin is not shown in the parts diagram.)
Remove the cover plate (#330) situated underneath the head body.
Loosen the three 5/8” hex nuts that hold the head body to the rear supporting structure (#79). Hold on to the head body while loosening the last nut. (Getting help from an assistant is convenient.)
Rotate the head body by hand and clamp the head into its new position by tightening the three 5/8” hex nuts.
Maintenance
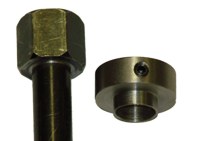
Drawbar
One of the R8 arbors could not be fully drawn into the spindle because the drawbar was too long. Rather than shortening the drawbar a spacer was created for the top of the bar. The drawbar shown here is after the sleeve underneath the hex head was machined away; a sleeve was created on the spacer. (Spacers also had to be placed under the arbor bolt cover so that it clears the now higher drawbar.)
Supplies
Standard hydraulic oil ISO grade 68: McMaster Carr (1016K31: 1 Gallon)